13 Sep First Arduino Project WIP I
After being introduced to Arduino in this year’s ITP camp (thanks Jody and Eric), I decided to start my own very first Arduino project. I have no background in programming, nor am I an expert in electric circuits. But if I can think of a project I’m truly interested in, I’m sure I’ll do anything I can, and learn anything I need to learn to get my project sorted out. And by the time my project’s done, I’d probably have learned a thing or two about Arduino, electric circuits and anything else in between.
My project
My project, coded “LW” (short for Last Words, before I come up with a proper name), will be an interactive installation allowing the participant to witness the last moment of a fictional character from a film. The experience will be highly symbolic. The character’s death will be represented by a light that turns on and off, and a robotic voice uttering the last words.
As the participant approaches the light, it turns on, the last words of a fictional character is played, the light turns off.
What I need
- Arduino
- Distance sensor (HC-SR04 range finder)
- A vintage light fixture with minimal design
- Power Relay (I didn’t even realized I needed this until I bought the light)
- Sound shield for Arduino (Wave shield kit)
- Soldering kit (again, I didn’t know this was needed until I bought the sound shield)
- Speaker
- A library of audio tracks of last words from fictional characters
- Correct wiring and Arduino sketch to make it work
Step1: Arduino, Sensor and LED Light
I came up with the project in July and did some research, by the time I really got started, it was already the beginning of August. I was a bit taunted by the number of new skills I had to learn to get the whole thing working, so I decided to break it down to small steps. My plan is to tackle the technical parts first, which I’m less familiar with, before I get into content and visual development.
Step one is to get the light and distance sensor working. I use a small LED light in place of the light fixture that I will eventually be using to test out the wiring and code. The video below shows how my sketch works.
I’ve decided the flickering of the light at the end is a little too much, the revised sketch below is simplified to the light turning on for 10 seconds as someone approaches and then turns off.
/* this sketch uses ultrasonic range finder HC-SR04, when distance is less than 10cm,
* LED on pin 7 lights up for 10 secs,then turns off for another 10 secs
*/
#include <NewPing.h>
#define TRIGGER_PIN 17
#define ECHO_PIN 1
#define LED 7
#define MAX_DISTANCE 200
NewPing sonar(TRIGGER_PIN, ECHO_PIN, MAX_DISTANCE);

void setup() {
Serial.begin(9600);
}

void loop() {
delay(50);
unsigned int uS = sonar.ping();
pinMode(ECHO_PIN,OUTPUT);
digitalWrite(ECHO_PIN,LOW);
pinMode(ECHO_PIN,INPUT);
Serial.print("Ping: ");
Serial.print(uS / US_ROUNDTRIP_CM);
Serial.println("cm");

if (distance < 10)
{
Light ();
}

void Light()
{
digitalWrite(LED, HIGH);
delay (10000);
digitalWrite(LED, LOW);
delay (10000);
}
}
Step 2: Adding sound
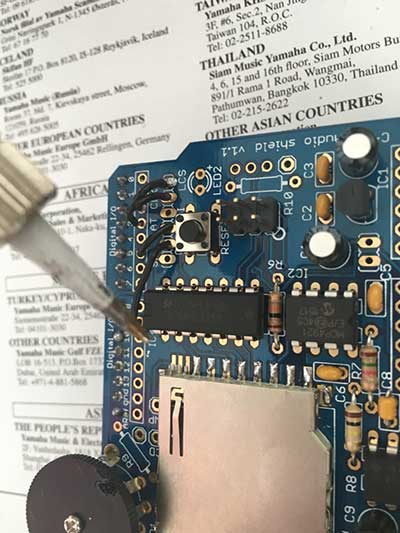
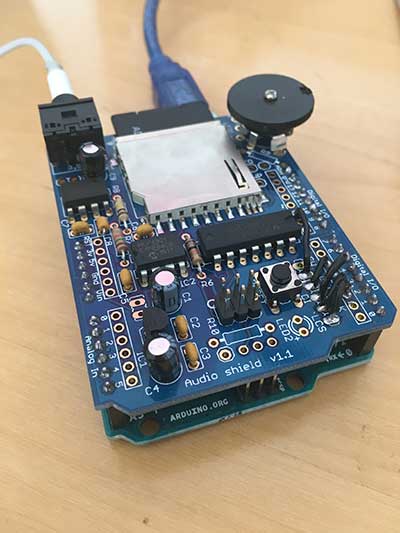
The next step is to get the sound working with the proximity sensor. I bought the sound add-on pack off of adafruit. It took some soldering to get the Wave shield together. I had never soldered before, but it turned out to be quite easy following the detailed tutorial on adafruit.
I created 5 example sound tracks and used the dap_hc.pde sketch and my headphones to test out if the shield was working.
Step 3: Merging the sketches
I got the LED reacting to the sensor. I added sound to my Arduino. Now I need to merge the LED/sensor sketch with a sound sketch to get the installation to work the way I want.
So far I’ve only managed to get the LED and sound reacting to the sensor at the same time. When the sensor is triggered, the LED lights up, the sound folder is played (yes, the entire folder of 5 tracks is played), and then the light turns off.
The sound doesn’t work the way I want it to work. Instead of playing the entire folder, I need to figure out how to play ONE RANDOM audio file from the library every time the sensor is triggered.
Challenges and Next Steps
I’m almost there.
Below are the remaining steps:
- Revise the sketch so the shield plays ONE RANDOM track instead of playing the whole list
- Replace the small LED with a vintage light fixture of my choosing
- Research and create a library of recordings (with robotic voice saying fictional last words in films)
- Test it out!
- Refine the experience based on tests
to be continued
No Comments